A gyroscope is a device that measures orientation using principles of angular momentum. Wikipedia has a great description of gyroscopes (http://en.wikipedia.org/wiki/Gyroscope), so if you want to read more I'd follow that link. Unfortunately, gyroscopes tend to drift over time which means for longer periods of time the measurement becomes inaccurate. Enter the accelerometer, which is used to correct for this drift.
An accelerometer is a device that measures (proper) acceleration. Again, if you want to know more about these devices check out Wikipedia's well written page on these devices (http://en.wikipedia.org/wiki/Accelerometer). Accelerometers do not have drift but are unstable for shorter time spans. Therefore Inerial Measurement Units were created and take advantage of the benefits of an accelerometer and gyroscope. The accelerometer provides a reference to the gyroscope and is used to remove the drift of the gyros. With the drift removed, this sensor combination offers more accurate long term motion detection and therefore can be used as a position tracking sensor for an object. A filter (e.g. Kalman) is usually implemented with an IMU and is the last component of my make-shift IMUs.
Accelerometers
As a refresher, here's the accelerometer from Adafruit Industries that I'll be using to sense motion of the pendulums linkages (https://www.adafruit.com/products/1231)
 w/ I2C/SPI - Click Image to Close") |
| ADXL345 Triple Axis Accelerometer |
| I soldered each of the accelerometers (see Adafruit link above for soldering and connection tutorial) and connected them to the Arduino Mega 2560. Below are the pin connections for these two components. |
VIN <—> 3.3V
GND <—> GND
SDA <—> SDA 20
SCL <—> SCL 21
 |
| Accelerometer to Arduino |
The accelerometer could also be connected to the 5V output pin of the Arduino, since the accelerometer regulates the voltage to 3.3V.
Next I plugged the Arduino into my MacBook Pro, started the Arduino software, and selected the correct board (Tools >> Board >> Arduino Mega) from the pull down menu. I copied the sensor test sketch (provided by Adafruit) into my Arduino library folder and opened the file sensortest.pde.
The sketch to test the accelerometer is designed to output the sensor's data into the serial monitor. After compiling the sketch, I clicked on the magnifying glass icon on the top right of the sketch to open the serial monitor. This allows you to see the sensor's output while moving it (real time) and test each of the accelerometers. This accelerometer measures acceleration (g's) in three dimensions and here is the output to the serial monitor:
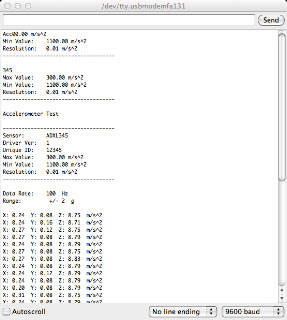 |
| Serial Monitor for Accelerometer Output |
Gyroscopes
As a refresher, here's the gyroscope from Adafruit Industries that I'll be using to sense motion of the pendulums linkages (https://www.adafruit.com/products/1032)
 Triple-Axis Gyro Breakout Board - Click Image to Close") |
| L3GD20 Triple Axis Gyroscope |
| I soldered each of the gyroscopes (see Adafruit link above for soldering and connection tutorial) and connected them to the Arduino Mega 2560. Below are the pin connections for these two components when connecting the gyroscope for SPI (Serial Peripheral Interface) communication. |
VIN <—> 5V
GND <—> GND
CS <—> Digital 4
SAO <—> Digital 5
SDA <—> Digital 6
SCL <—> Digital 7
Alternatively, since the L3FD20 supports both SPI and I2C (Inter Integrated Circuit) communication, you can connect the gyroscope so it uses I2C communication (fewer wires). Also of minor note: I2C is pronounced "I squared C".
Gyro Arduino
VIN <—> 5V
GND <—> GND
SDA <—> SDA 20
SCL <—> SCL 21
In case you haven't already, make sure to select the correct board (Tools >> Board >> Arduino Mega) from the pull down menu when communicating between your computer and the Arduino. I copied the Adafruit_L3DG20 Gyro Code sketch (provided by Adafruit) into my Arduino library folder. I had to make a few modifications (missing libraries) to the sketch provided by Adafruit before it would run and I also added some comments to the code... but all credit for this sketch should go to AdaFruit Industries.
//Adafruit_L3DG20 Gyro Code
// Import Libraries
#include
#include
#include
// Must first call a constructor to create a device object.
// There are two forms of the constructor:
// 1. I2C wiring
// Adafruit_L3GD20 gryo(); no need to specify pins for I2C
//
// 2. SPI Wiring
// Adafruit_L3GD20 gyro(int8_t cs, int8_t mosi, int8_t miso, int8_t clk);
// Define the pins for SPI wiring
#define GYRO_CS 4 // labeled CS
#define GYRO_DO 5 // labeled SA0
#define GYRO_DI 6 // labeled SDA
#define GYRO_CLK 7 // labeled SCL
Adafruit_L3GD20 gyro(GYRO_CS, GYRO_DO, GYRO_DI, GYRO_CLK);
// ----- INITIALIZATION ----- //
// Initialize the gyro with the sensitivity range that will be using
//bool begin(l3dg20Range_t L3DS20_RANGE_250DPS);
// where the second variable above (range) can be one of
//L3DS20_RANGE_250DPS //- for 250 degrees-per-second range (default)
//L3DS20_RANGE_500DPS// - for 500 degrees-per-second range
//L3DS20_RANGE_2000DPS// - for 2000 degrees-per-second range
//int incomingByte = 0; // for incoming serial data
void setup()
{
// Open serial port and sets data rate to 9600 bps
Serial.begin(9600);
// Try to initialise and warn if we couldn't detect the chip
if (!gyro.begin(gyro.L3DS20_RANGE_250DPS))
{
Serial.println("Oops ... unable to initialize the L3GD20. Check your wiring!");
while (1);
}
}
// ----- SENSING ROTATION ----- //
// To sense rotation must first call the 'read()' function to take a reading
// void read(void);
// This function takes no parameters. After calling 'read()'. The raw x,y,z
// readings can be retrieved from the device object's 'data' member.
// data.x - x-axis rotation rate in degrees-per-second
// data.y - y-axis rotation rate in degrees-per-second
// data.z - z-axis rotation rate in degrees-per-second
void loop()
{
// Read the input
gyro.read();
// Print out what was read in
Serial.print("X: ");
Serial.print((int)gyro.data.x);
Serial.print(" ");
Serial.print("Y: ");
Serial.print((int)gyro.data.y);
Serial.print(" ");
Serial.print("Z: ");
Serial.println((int)gyro.data.z);
Serial.print(" ");
// Delay 100 milliseconds before the next reading
delay(100);
}
// ----- ALTERNATE UNITS ----- //
// The values reported by the read() function are in degrees-per-second (dps).
// For some calculations, it may be more convenient to work in radians.
// To convert dps to radians-per-second (rad/s), simply multiply by 0.017453293 as
// in the following code:
//#define SENSORS_DPS_TO_RADS (0.017453293F) /**< Degrees/s to rad/s multiplier */
//
//void loop()
//{
// gyro.read();
// Serial.print("X: "); Serial.print((int)gyro.data.x * SENSORS_DPS_TO_RADS); Serial.print(" ");
// Serial.print("Y: "); Serial.print((int)gyro.data.y * SENSORS_DPS_TO_RADS); Serial.print(" ");
// Serial.print("Z: "); Serial.println((int)gyro.data.z * SENSORS_DPS_TO_RADS); Serial.print(" ");
// delay(100);
//}
Just like the sketch to test the accelerometer, the gyroscope's sketch is designed to output the sensor's data into the serial monitor for real time viewing. After compiling the sketch, I clicked on the magnifying glass icon on the top right of the sketch to open the serial monitor. This allows you to see the sensor's output while moving it and test each of the sensors. This gyro measures degrees per second (deg/sec) in three dimensions, so if you want to convert to units of radians/sec see the above code section "Alternative Units".
 |
| Serial Monitor for Gyroscope Output |
To SPI or I2C? That is the question.
SPI was invented by Motorola and I2C was invented by Phillips as a means of serial communication. Instead of me pretending to be an expert on I2C, I found this great posting from this other blog about I2C (http://dev.emcelettronica.com/i2c-or-spi-serial-communication-which-one-to-go)...
SPI supports full duplex communication with higher throughput than I2C. It is not limited to 8-bit words so you can send any message sizes with arbitrary content and purpose. The SPI interface does not require pull-up resistors, which translates to lower power consumption. However, I2C is simpler by having fewer lines which means fewer pins are required to interface to an IC. When communicating with more than one slave, I2C has the advantage of in-band addressing as opposed to have a chip select line for each slave. I2C also supports slave acknowledgment which means that you can be absolutely sure that you’re actually communicating with something. With SPI, a master can be sending data to nothing at all and have no way to know that. In general SPI is better suited for applications that deal with longer data streams and not just words like address locations. Mostly longer data streams exist in applications where you’re working with a digital signal processor or analog-to digital converter. For example, SPI would be perfect for playing back some audio stored in an eeprom and played through a digital to analog converter DAC. Moreover, since SPI can support significantly higher data rates comparing to I2C, mostly due to its duplex capability, it is far more suited for higher speed applications reaching tens of megahertz. And since there is no device addressing involved in SPI the protocol is a lot harder to use in multiple slave systems. This means when dealing with more than one node, generally I2C is the way to go.
Kalman Filter
The Kalman filter uses the measurements from the IMU sensors, which like any real-world measurement contain noise, to produce an estimates of unknown variables (e.g. angular position) that tend to be more precise than those based on a measurement from only an accelerometer or gyroscope.


